
Are you looking for a meaningful gift for the sewer or quilter in your life, but have no idea where to start? Finding the perfect gift can be tough when it seems like they have everything and you don’t sew or quilt yourself. With so many sewing supplies, tools, notions and fabrics out there, it’s no wonder you might find yourself looking for a little guidance so you don’t have to ask for hints and spoil the surprise.
Whether you’re looking for the perfect Christmas present, stocking stuffer or Mother’s Day gift; there’s sure to be something they’ll love and appreciate on this list. Everything on this list is handpicked by us at The Mother Huddle with careful thought and consideration. We’ve made sure you won’t be short on gift ideas with more than 40 quilting and sewing themed gifts.
This post contains affiliate links. If you purchase after clicking these links, The Mother Huddle may receive a small commission, at no cost to you.
Best Gifts For Sewers
Sewing gifts are sure to make your sewing friends and family happy at any time of year! From birthdays, to Mother’s Day and Christmas; we have gift ideas that’ll help them tackle their next project and show off their love for sewing to everyone who comes over to visit. Fabric is always a great gift, but you can give them something else that won’t get lost in their collection.
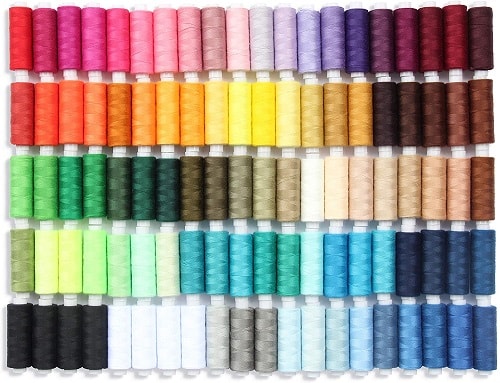
Sewing Aid Set Of 100 Sewing Threads
[amazon fields=”B07CMFYRKJ” value=”price”] | (was [amazon fields=”B07CMFYRKJ” value=”list_price”], now [amazon fields=”B07CMFYRKJ” value=”percentage_saved”] off)
Sewers of all kinds know how important it is to have matching thread and this is something you cannot easily eyeball without the fabric being used on hand. That’s why this set of 100% polyester mixed assortment thread is such a great gift! There’s a whopping 92 colors included in this set with every shade they could need and in between. This gift is sure to go over well and save your sewer from a quick stop craft store in the near future.
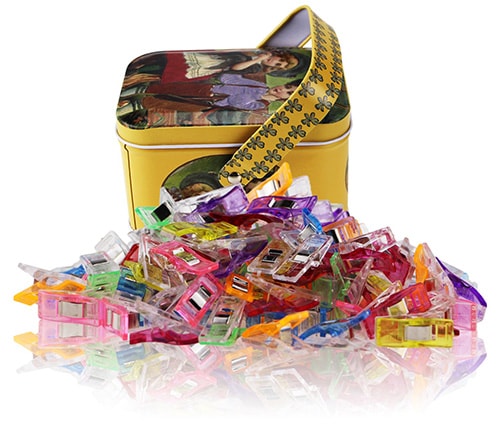
MumCraft Multipurpose Sewing Clips
[amazon fields=”B001PNIWT2″ value=”price”] | (was [amazon fields=”B001PNIWT2″ value=”list_price”], now [amazon fields=”B001PNIWT2″ value=”percentage_saved”] off)
Sewing clips might be one of the most useful gifts you can gift this holiday season or for a special event! They’re perfect for tightly holding together multiple layers of delicate fabrics as you sew unlike pins which can easily damage them. They’re also quicker, easier to use than sewing pins too; when putting on fabrics and removing them without poking yourself or losing them.
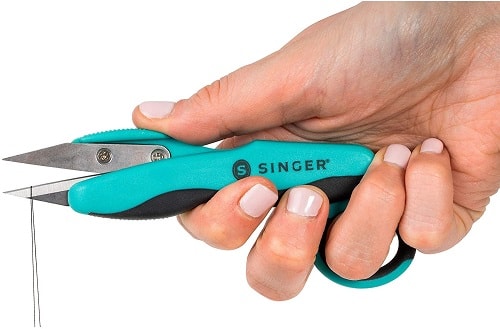
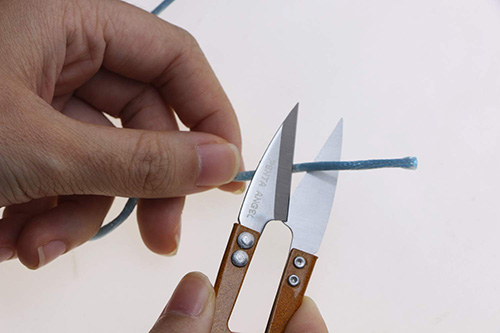
SINGER 00564 Pro Series Thread Snips
[amazon fields=”B00VU4S8GS” value=”price”] | (was [amazon fields=”B00VU4S8GS” value=”list_price”], now [amazon fields=”B00VU4S8GS” value=”percentage_saved”] off)
Easily snip away unwanted threads for clean and tatter free projects with these smaller thread snips than ordinary fabric shears. They’re easier to handle for smaller cuts, sharp, durable and have a lifetime guarantee with Singer.
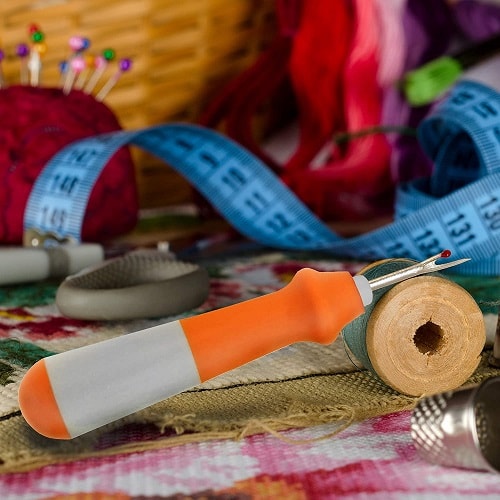
Ergonomic Seam Ripper
[amazon fields=”B07YTR51HN” value=”price”] | (was [amazon fields=”B07YTR51HN” value=”list_price”], now [amazon fields=”B07YTR51HN” value=”percentage_saved”] off)
No matter how good of a sewer they are mistakes happen and seam rippers are super handy to have on hand! Your sewing loved one most likely has a seam ripper or two around their craft room, but this particular seam ripper is made with an ergonomic handle that’s much easier on their hands and wrists. If you’re looking for a something a little extra, this seam ripper makes a great stocking stuffer.
Steamfast SF-717 Mini Steam Iron
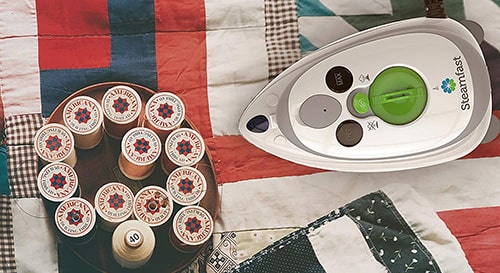
[amazon fields=”B001DTHPEQ” value=”price”] | (was [amazon fields=”B001DTHPEQ” value=”list_price”], now [amazon fields=”B001DTHPEQ” value=”percentage_saved”] off)
Mini irons are also a must have for quilters, seamstresses, dress makers and all sorts of sewers. It’s handheld, making it so much easier to use than an ordinary house iron. It’ll heat up and remove all wrinkles from your fabrics within one minute before sewing.
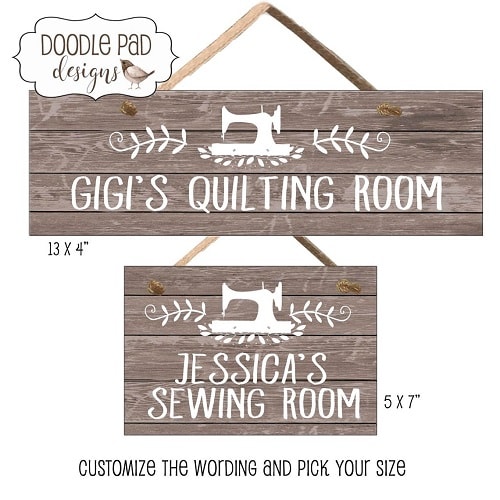
This farmhouse style inspired sign is a beautiful addition to any craft room, sewing room or quilting room. They can hang it outside their door or in the room. The wording is customizable too, so if you’d like it to say something different, like craft room or quilting room or it’s for your sister or grandmother just leave it in the notes!
Life Is Short Buy The Fabric-Makeup Bag
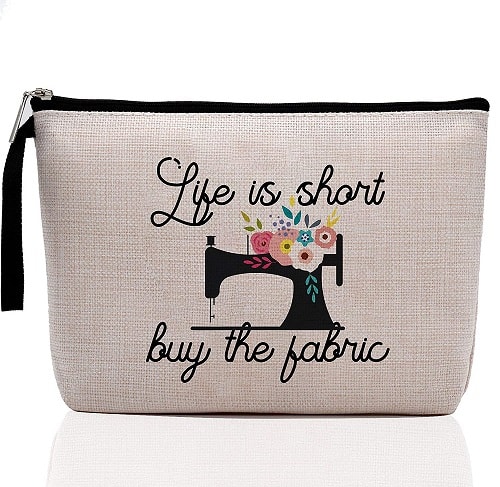
[amazon fields=”B08LGZBGPL” value=”price”] | (was [amazon fields=”B08LGZBGPL” value=”list_price”], now [amazon fields=”B08LGZBGPL” value=”percentage_saved”] off)
Give a gift that’s useful and thoughtful like this ultra-cute “life is short buy the fabric” makeup bag. Even if the recipient of your thoughtful gift doesn’t like makeup, it doesn’t need to be used just for makeup. It fits cell phones, chargers, keys, wallets, feminine hygiene products and more perfectly. It is waterproof on the inside protecting what’s inside from moisture and also not allowing any products to leak out. You can even make it into a gift bag!
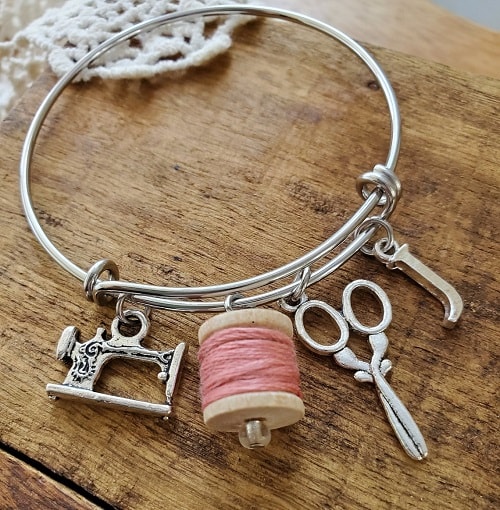
Sewers, quilters and seamstresses who like jewelry will love this sewing charm bracelet. It’s handmade and can be fully customizable ensuring whomever receives it won’t already have another bracelet like it. Contact the seller to customize your gift and if you’re in a rush gift wrapping is available.
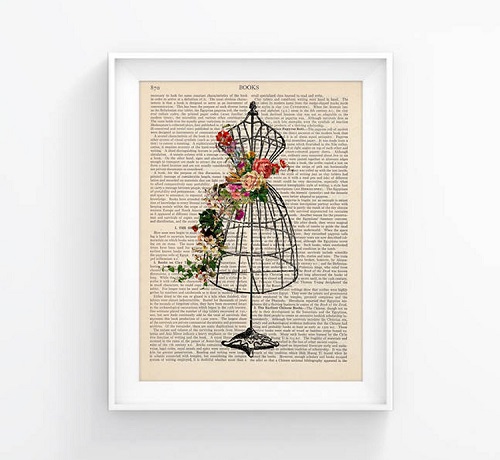
Dressmakers and seamstresses alike will love this dress form print! Each print is upcycled from a page from an antique English Encyclopedia Britannica. No two prints are exactly alike. They’re made from real books with imperfections you’d expect from once well-loved books.
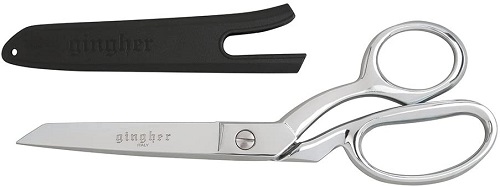
Gingher 8-Inch Knife Edge Dressmaker’s Shears
[amazon fields=”B000UU6SR4″ value=”price”] | (was [amazon fields=”B000UU6SR4″ value=”list_price”], now [amazon fields=”B000UU6SR4″ value=”percentage_saved”] off)
An excellent pair of shears is absolutely essential for quilters, dressmakers, seamstresses and sewers of all kinds. A master sewer would never get caught with a dull pair of scissors! These shears in particular are perfect for longer cuts like clothes making seams and quilting patterns. They’re have ultra-sharp blades and have a bent handle to ensure your fabrics stay flat and smooth for the most precise cuts as possible.
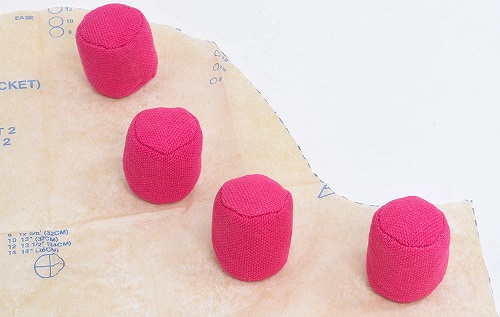
Fabric Pattern Weights
[amazon fields=”B000W5GFIO” value=”price”] | (was [amazon fields=”B000W5GFIO” value=”list_price”], now [amazon fields=”B000W5GFIO” value=”percentage_saved”] off)
Cut and draw patterns perfectly snug and in place with these pattern weights! They’re meant to be used without pins so your fabric lays flatter and you don’t damage or snag delicate fabrics. Four weights come in one set, so an extra set or two as a gift is always welcomed for any sewer.
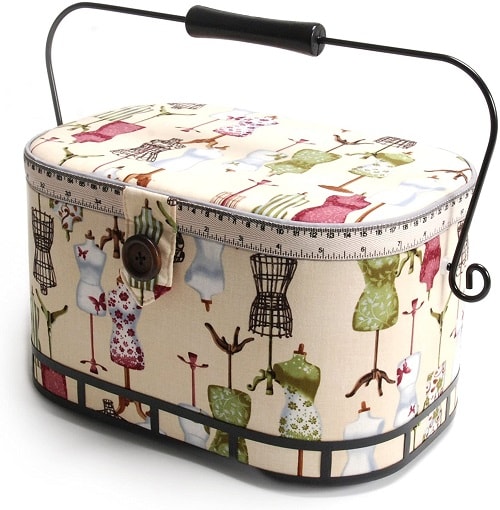
Dritz St. Jane Sewing Basket
[amazon fields=”B00FAAIVX8″ value=”price”] | (was [amazon fields=”B00FAAIVX8″ value=”list_price”], now [amazon fields=”B00FAAIVX8″ value=”percentage_saved”] off)
Sewers can never have too much portable storage, but this sewing basket is especially beautiful for clothing and dressmakers. It’s great for portable storage so they can carry their current project wherever they want to work on it. Perfect for a standalone gift or stuffed with well needed sewing notions.
Ultimate Sewing Starter Kit
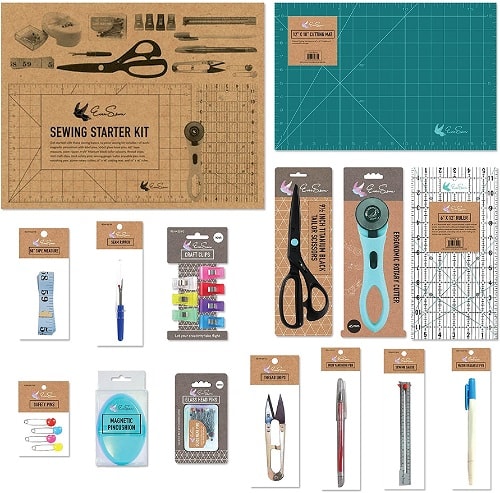
[amazon fields=”B01M6W4EPG” value=”price”] | (was [amazon fields=”B01M6W4EPG” value=”list_price”], now [amazon fields=”B01M6W4EPG” value=”percentage_saved”] off)
If your friend or loved one is just getting started sewing or looking for a new hobby; consider this ultimate sewing starter kit. Everything they’ll need from a cutting mat to thread snips and pins are included in this box. It comes with 14 pieces total and is boxed up neatly ready to wrap.
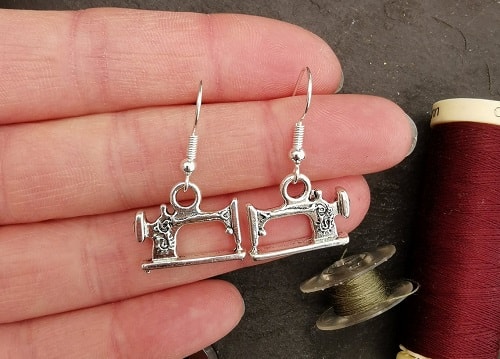
These gorgeous sewing machine drop earrings make a great gift for those who love sewing, quilting or crafting with fabrics. They’re safe for those with allergies as they made lead and nickel free. Plus, they’re also not heavy and come with stoppers so they don’t fall out.
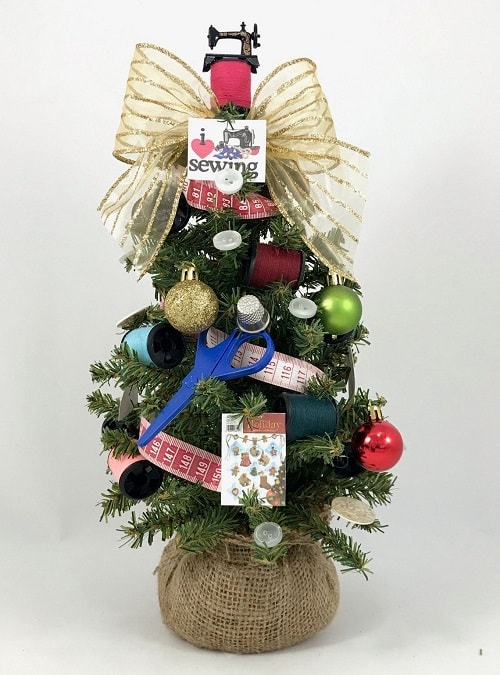
You can never have too many Christmas trees! This tree is decorated with everything sewing! With measuring tape garland, bobbin ornaments and a sewing machine topper; this tree is perfect for the quilter or seamstress in your family. It’s fewer than 3 feet high so it can be displayed anywhere that needs a holiday tree.
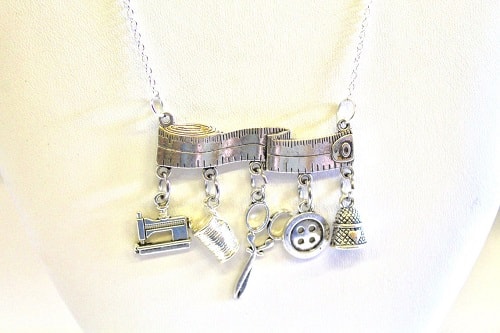
Adorned with sewing notions this one of a kind statement necklace is sure to win over anyone who loves sewing! If you’d like to add a special touch, this gift is customizable. It’s arrives already boxed and ready to gift!
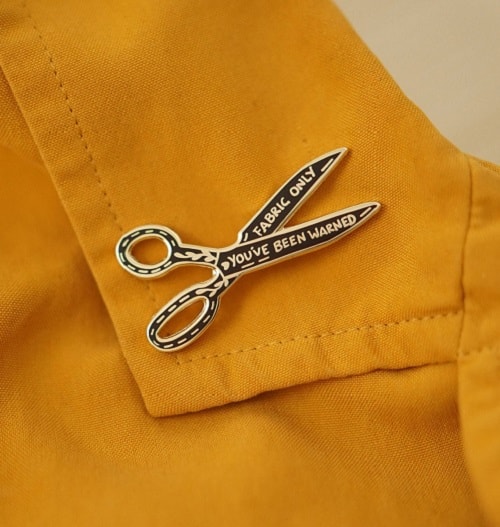
If you’re looking for a small gift to give to your favorite sewer this holiday season, this “fabric only you’ve been warned” fabric scissors enamel pin will undoubtedly delight. Enamel pins are back in and only sewers know how important it is to have scissors specially designated for fabric use only. This pin can be used on jean jackets, purses, guitar straps, and hats or even put on display.
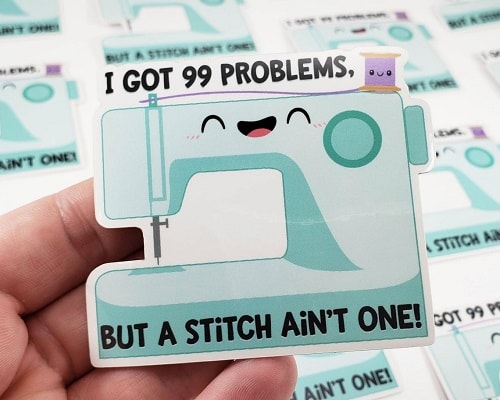
Looking for a gift you can easily put in the mail without a trip to the post office? Consider this sewing machine sticker. It’s not your average sticker. Made of high quality water resistant vinyl, it can be used on sewing binders, sewing machines, bullet journals and more.
These fun sewing themed magnets are magnets your sewing friend will love to keep! They’re perfect small gift for the fridge, office board or school board. Each magnet is handmade and secured to a strong magnet. They come in a tin ready to wrap.
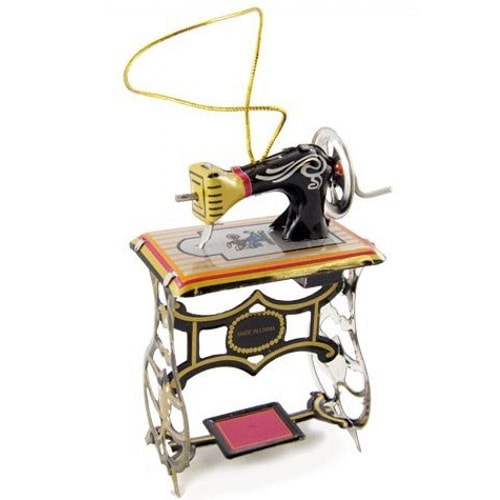
This isn’t just any old sewing machine; it’s an incredibly detailed reproduction of Singer’s foot treadle powered fabric sewing machine. It was breakthrough technology when it came out and the avid sewer or quilter in your life will love to add this beloved predecessor to all modern sewing machines to their Christmas tree!
Best Gifts For Quilters
When looking for the right gift for a seasoned quilter, you can’t go wrong with something that’ll make their projects easier or something they can have that’ll show off their love for quilting. Whether you’re looking for something to help them with their hobby or would like to avoid the craft store altogether and get them something you know they don’t have; these gifts are sure to put a smile on their face.
PENTA ANGEL 4.1inch Sewing Scissors
[amazon fields=”B01J37Z2DK” value=”price”] | (was [amazon fields=”B01J37Z2DK” value=”list_price”], now [amazon fields=”B01J37Z2DK” value=”percentage_saved”] off)
Alternate tools on different jobs for quilters can make their work so much easier. These sewing scissors might just be the best thread nippers out there. They work best for smaller snipping like thread, ribbons, smaller pieces of fabric and embroidery floss. The smaller but sharper blades make cutting them much easier and safer than a standard pair of fabric scissors.
That Purple Thang Tool
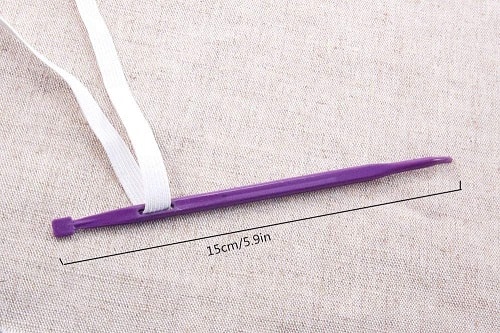
[amazon fields=”B07QKVBK31″ value=”price”] | (was [amazon fields=”B07QKVBK31″ value=”list_price”], now [amazon fields=”B07QKVBK31″ value=”percentage_saved”] off)
This is a nice to have tool your quilter will wonder how they sewed without it all these years! It’s great for odd situations like pushing or pulling thread so it doesn’t bunch up in your machine and it’ll push out the corners of whatever they’re sewing. So many quilters and sewers love this little tool so much that they wear it around their neck for every sewing project!
Magnetic Pin Cushion
[amazon fields=”B019E6FY9M” value=”price”] | (was [amazon fields=”B019E6FY9M” value=”list_price”], now [amazon fields=”B019E6FY9M” value=”percentage_saved”] off)
This pin cushion is the upgraded version of the classic tomato pin cushion we all started with. It’s magnetic so it’ll hold your pins where you place them in the ready to pick up position. It’s also extraordinarily useful when you can’t find dropped pins on your floor, lap or workspace. All you need to do is waive it over where you think it could have landed and it’ll pick them right up!
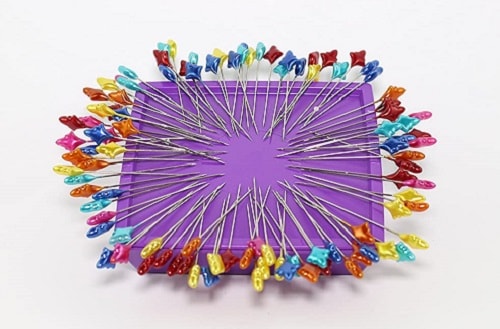
Button Head Sewing Pins
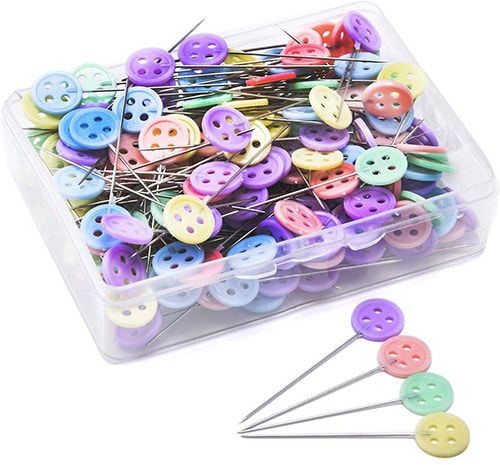
[amazon fields=”B01NCIC7EG” value=”price”] | (was [amazon fields=”B01NCIC7EG” value=”list_price”], now [amazon fields=”B01NCIC7EG” value=”percentage_saved”] off)
These button head sewing pins are thin enough to be sewn over and longer than ordinary quilter’s pins. They have decorative buttons on the top too that’ll keep your fabric as flat as possible and be easier to remove than ordinary harder to see round head pins.
Iron-Off Pen
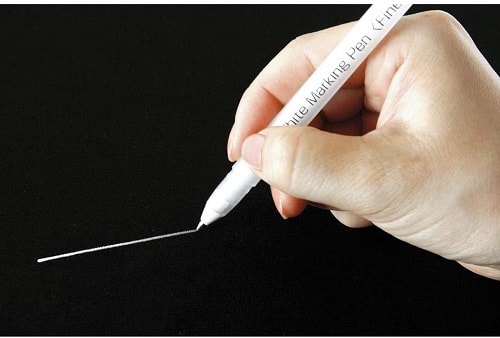
[amazon fields=”B0011459YQ” value=”price”] | (was [amazon fields=”B0011459YQ” value=”list_price”], now [amazon fields=”B0011459YQ” value=”percentage_saved”] off)
If you or a friend loves quilting and probably has every quilting gadget out there, consider this white marking pen. It’s the perfect solution to hand marking quilting patterns on quilt tops of dark fabrics. It doesn’t rub off easily during the quilting process like quilting chalk and the ink isn’t permanent or damages the fabric. Simply wash or iron the piece and it disappears.
Personalized Quilting Room Chalkboard
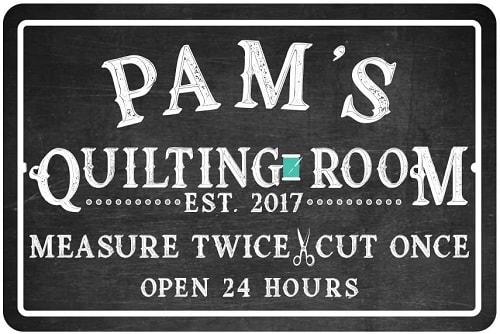
[amazon fields=”B077PQJ7D4″ value=”price”] | (was [amazon fields=”B077PQJ7D4″ value=”list_price”], now [amazon fields=”B077PQJ7D4″ value=”percentage_saved”] off)
Chalkboard signs are totally in right now! This sign is designed to look like a chalkboard without the messy chalk and dullness of an actual chalkboard. They are made of aluminum and are personalized for your favorite quilter.
Quilting Queen Ornament
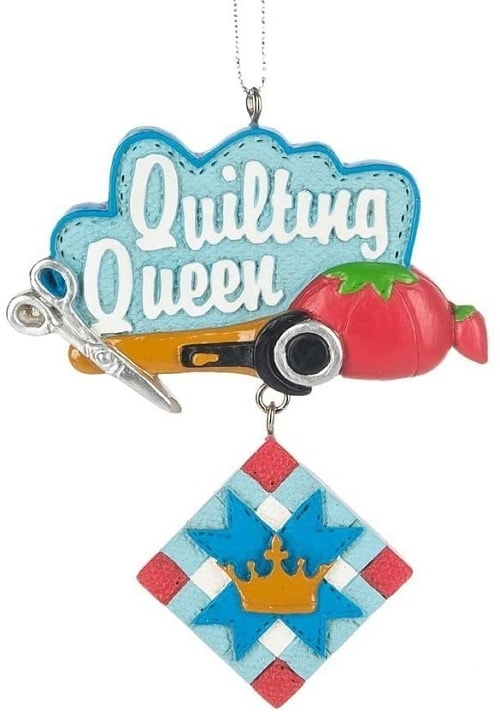
[amazon fields=”B01DH58YZW” value=”price”] | (was [amazon fields=”B01DH58YZW” value=”list_price”], now [amazon fields=”B01DH58YZW” value=”percentage_saved”] off)
Bring a little extra holiday cheer to your quilting hobbyist’s home with this Christmas tree ornament. It comes adorned with quilting shears, rotary cutter, a classic tomato pin cushion and a quilting square. Any master quilter will love this ornament for years to come.
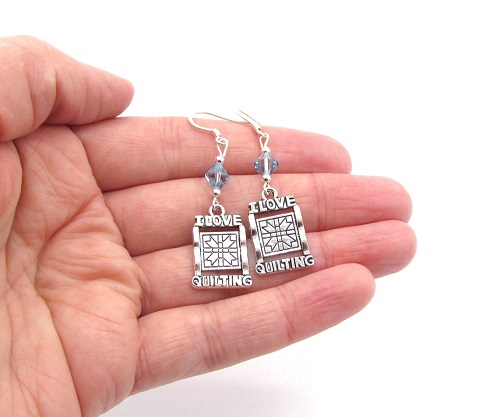
These “I love quilting” earrings with an etched classic quilt pattern make a perfect gift or stocking stuffer for anyone who likes to quilt. They’re made with Swarovski beads of their favorite color. If you love this piece, you can gift the whole set. Matching pieces are available.
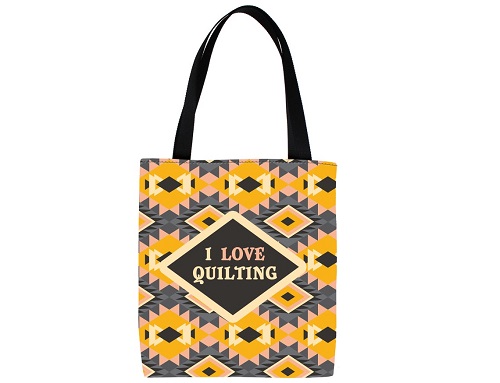
For quilters who don’t wear jewelry or don’t have their ears pierced, consider this “I love quilting” tote bag! It’s great for shopping, running errands, going to the farmers market or attending your next quilting class. If you know their favorite quilting pattern, you can get it on their tote because they’re customizable!
3 comments
I needed help to find sewing stuff to give my wife for Christmas. She’s a lower end intermediate and has recently showed a an increased interest in sewing, especially for clothes for our 5 year old with special needs. Of all the list I looked at yours was easily tops. I found you to be authoritative and helpful, enough so that I decided to go with just your list exclusively. You have so many neat suggestions that even I, a sewing dummy, could discern as great, practical recommendations. And it was up to date with all but one of eight items I selected available! (The dressmaking shears are on back order so those will be great a little down the road.)
I wanted to thank you so much for the help. I’ll be pointing her to this site, and this article after the unwrapping.
This reply is a little late, for sure, but I wanted to say thank you and you’re welcome! I hope your wife has loved beginner her sewing adventure!
Such a great list!! My mom who loves to sew is going to love all of these!! Thanks so much!